Projector Installation

📄 It is normally easiest to install the projector with the mirror in the ‘down’ position as this gives easier access into the frame.

⚠️ Installation of the projector will require a minimum of two people and a lifting aid is recommended

  1. Remove the Projector Mount locking plates - Slacken the locking bolts

  2. Slide the locking plates out the slot

  3. Remove the locak plates

get?access_key=eyJpdiI6InpNdFpkVDRWS3k0SEdkQkxRdzFkdkE9PSIsInZhbHVlIjoidExvTXBsZCtwV29Pc3RmdnBETEdFZWtETzZLODZ3TjlEcWhKY3U3b0QwdDNDSkhYbDdjQUFyZDNiWW1kNUx6SGJNTGFETXJQQmtnRFZPdXRwUkh6aTI4UWszOXR0eVR5ZEhuZ3N6blBtdUk9IiwibWFjIjoiMmMyZDNiOTc0ZmQ2YWQzNDE5MGQ0NjM1ZGZkMDZjMzNhYWE3NTRlMWFlMjM2ZmY4M2VkZjVhZTE1MzE2MjVlMyIsInRhZyI6IiJ9&path=item-files%2F59727%2Fybu5sPofcR55zbMxeb5bTE1TXkiJmJlVp03QfvSb.png&signature=0572b6124ad390fb6f6ddd268a8c1501e6cc736bd672a61af5f521afb53eaeb1

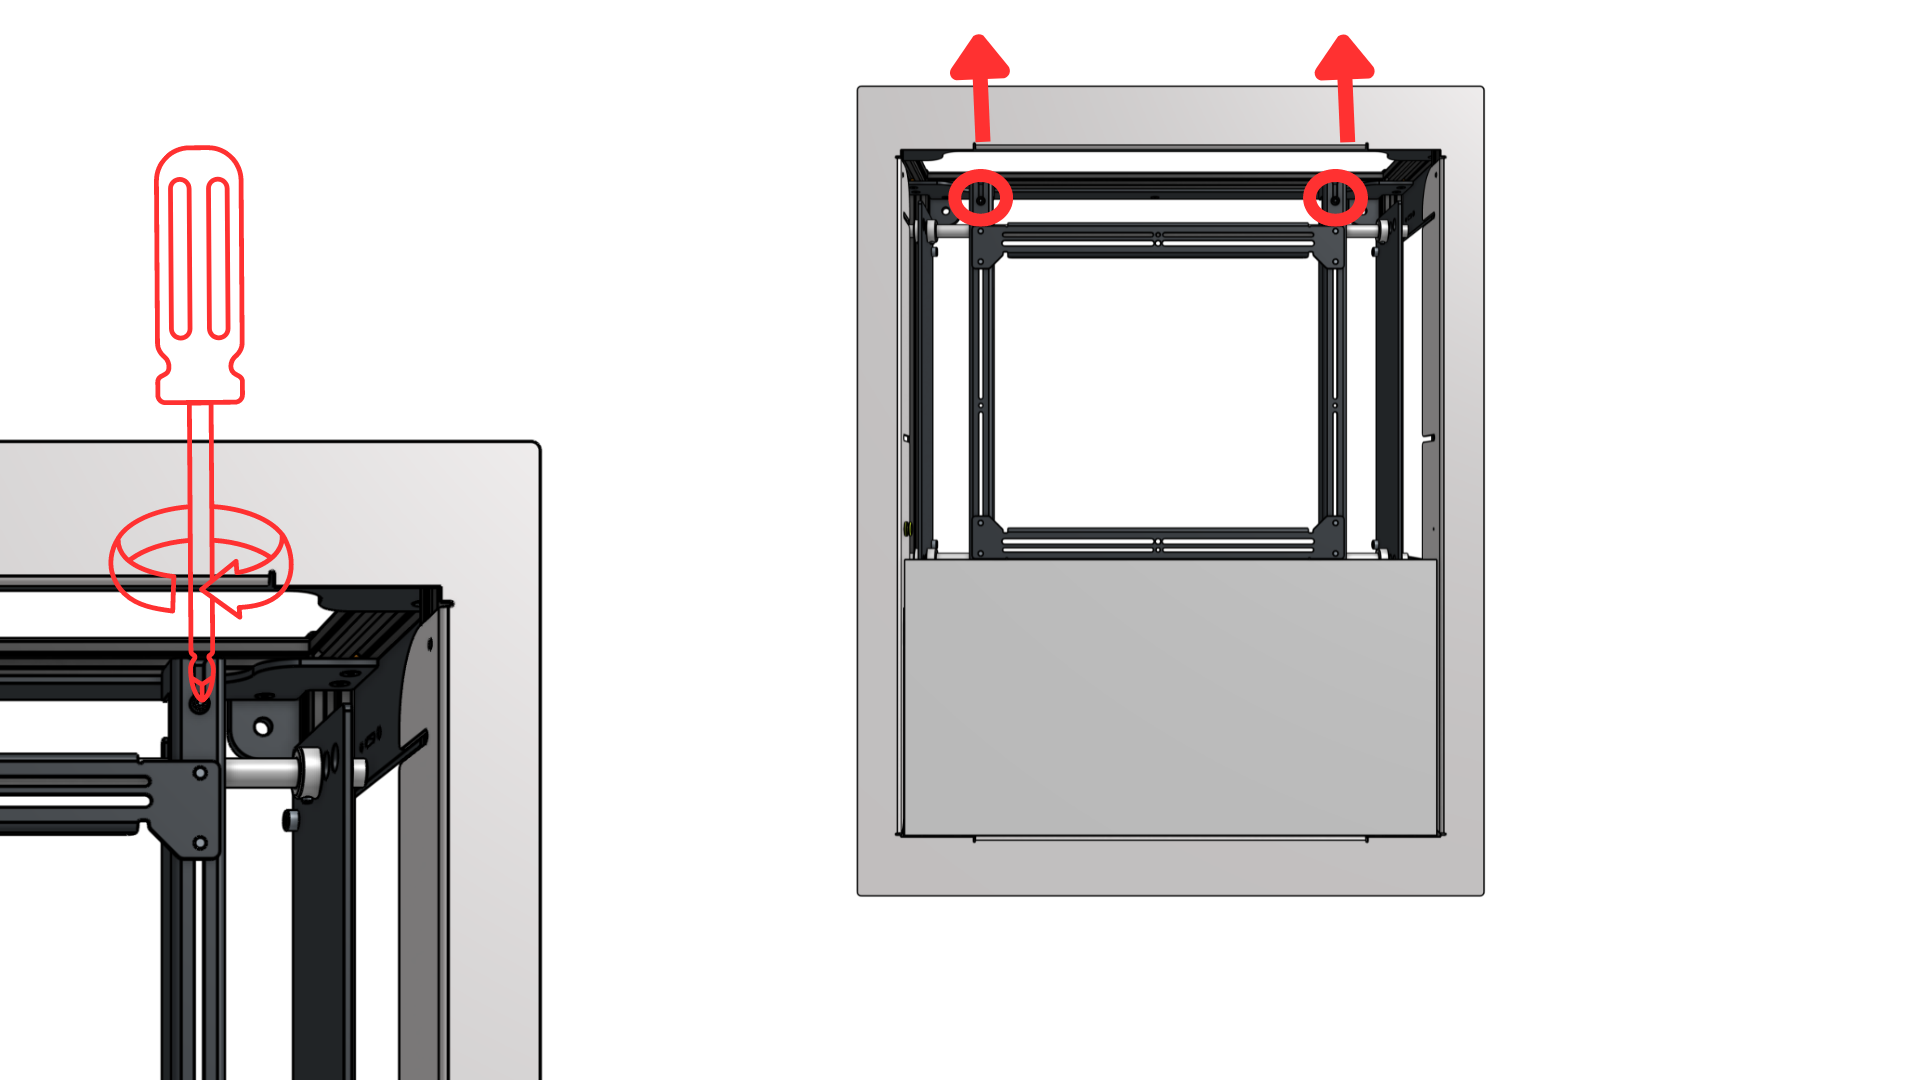
Figure 1 - Projector Mount Locking removal

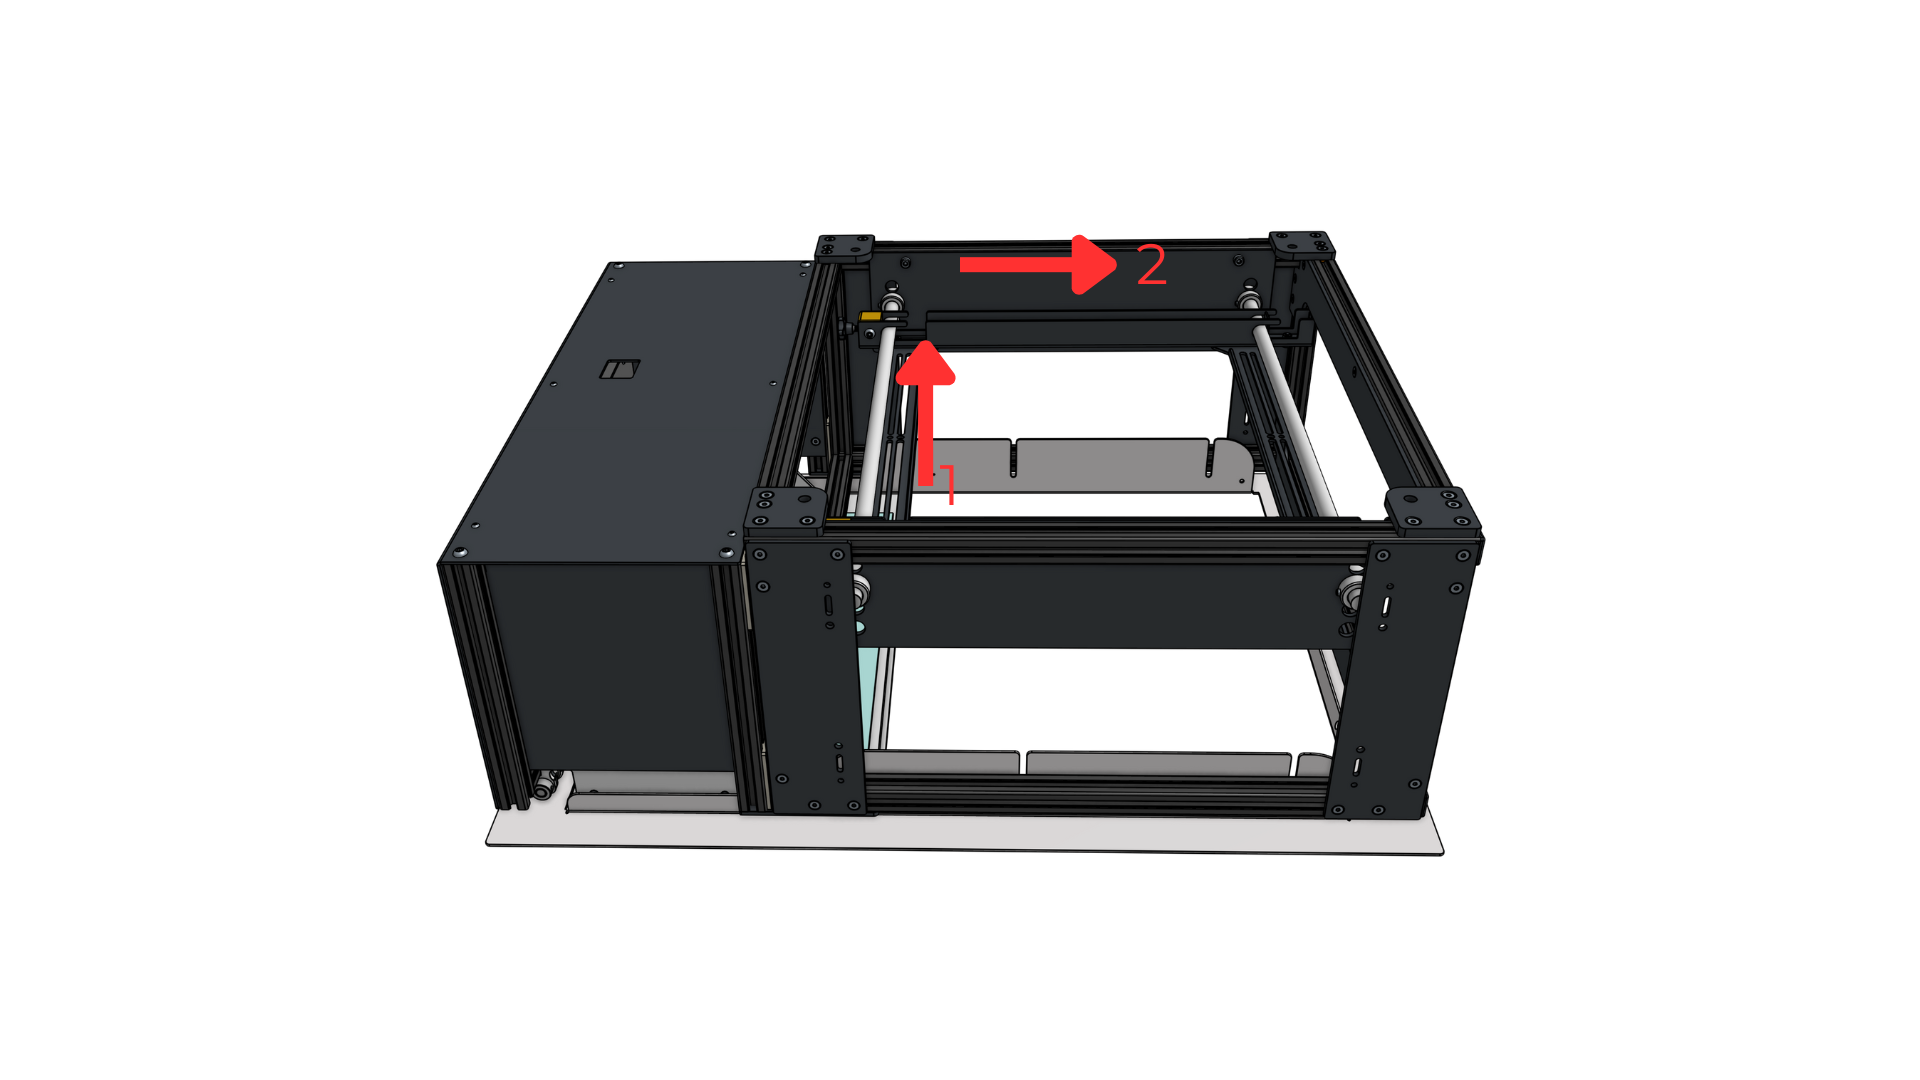
  1. Remove the projector mount bracket. Slide the bracket forward then down to disengage the hooks from the mount bars

get?access_key=eyJpdiI6IldhQTJCRlpOdnFqVEpNaVA2QTlUOFE9PSIsInZhbHVlIjoiUU54NExUUVZ0WGl1MnpDazY2N2laYjdrZ0gvM1FNcDNCcWlLYjRWdndNNE9Yd3l1VFJLelBiZzRCcUhiRVkyMmEwWTRVZWRaeDh0QjNlT1I0aER6K2k5OFNLRDVPeElvR0RxcFI1SVp3eTA9IiwibWFjIjoiZDc5OWZlMjE3Njg0NjEwMDkyMGNhNmI4OTVlYzAyZjIwMzRkZGI2ZDc4MDE1ZmE2OTAyMzE4MDgwNGVhYWJlMyIsInRhZyI6IiJ9&path=item-files%2F59727%2FwbhQYWhct5Qf1NySO6k9N8cUyeMDJVBP02Re0SJ5.png&signature=1b3d5bdc9156ff1d04dd621f68a8274858d6e881259e761e5824c67cd9d78517Figure 2 - Projector Mount removal

Fitting the Projector Frame

  1. Lay the projector with its base facing up ready to fit the projector frame. Ensure that the projector is laid on something that protects if from scratches or damage.

  2. Lay the projector frame on the base of the projector with the hooks of the projector frame facing down towards the back to the projector.

  3. Using the relevant fixings and washers to fit the top bar of the mount frame to the projector.

get?access_key=eyJpdiI6ImhOREg2YU1SR0pBeXluNDVvSm9HTGc9PSIsInZhbHVlIjoiWCt2Vy9Tb1BYd0VRazBOaVhOQi9CNVgyTGlGWng5ZjRNajJBLzduZThLazM4MUwyVm9CWFAxcTI3MG92MHEwVnlOeDk4cjRWSXpzdVRvZEt5VDB5dXpTc2EydE1BdS8xaE05cVhJdFNTYWs9IiwibWFjIjoiODcyYmY4YTA1NTkzMTM1MTM0NmYxOGU5NzFiY2VlNzljN2QyODAwMGNmYzRhMGZjMzE0MWFhNTI2ZjRkMGQyNiIsInRhZyI6IiJ9&path=item-files%2F59727%2FM54Wta9vRXKmHZILOvHNBRC1HBpvxekNC1J5bd1Q.png&signature=4a2232a303c229ea561834cf0502cba416dbf45d32d08b593a327e20c310dc95

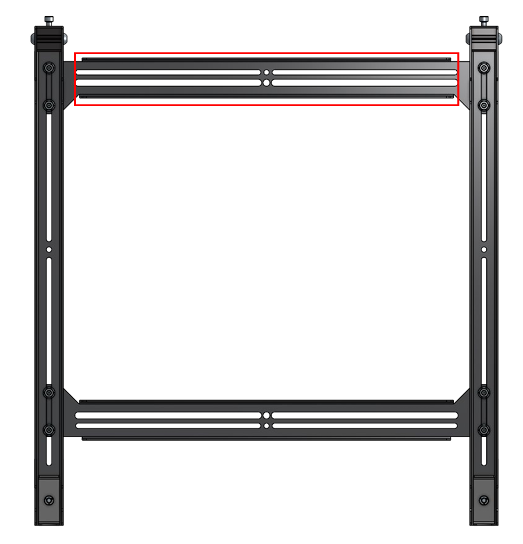
Figure 3- Projector Mount

  1. Slacken the M6 nuts holding the bottom bar of the mount frame and move this until it aligns with the projectors rear set of mounting holes. Use the 10mm Socket spanner provided for this.

get?access_key=eyJpdiI6IjJrczJEVmJxZ3lSRnpIR28rYkdKakE9PSIsInZhbHVlIjoid3hjcTJwMWRiZnRkNG1adVdFQzNLM2pBVG9YMTcrQzQ5cEhYeENzYmtrd0V0ZGtvOGFrL3NJRS9YSHM5bVdsVUM4UjhzbTB5aTJTcEVYbnFKeE1CZUt3Y2tHaWtWV0FwYVNyTHlNb0NIYkk9IiwibWFjIjoiNmE2ZDlmZmQxYTc3M2RjODEyODlmOGQxODg3NmI2ODg0NDNiODVlOTQ2OWI4MjdkZjZjNjU4NWJhMTJjZTlkNiIsInRhZyI6IiJ9&path=item-files%2F59727%2FMRXVxsrIm5z9IWNQOs1VLBat1zQRNCVKssmXlA6D.png&signature=7b30679a7c5a264d3ba1d97675d482a170522c8f90217cdd8f62aeb2c16e3c4a

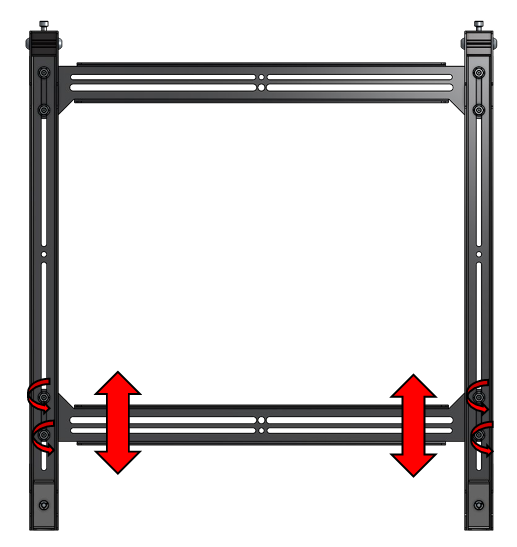
Figure 4- Projector Mount Adjustment

  1. Using the relevant fixings and washers to fit the top bar of the mount frame to the projector.

  2. Tighten all the M6 nuts holding the bottom bar and top bar of the mount frame. Use the 10mm Socket spanner provided for this.

Hanging the projector

Hanging the projector is a reverse of the removal of the bracket.

  1. Raise the projector with the mountig bracket attached up into the MMD-S

  2. Enguage the hooks on the moubnt bracket onto the mouting bars.

  3. Slide the projector back to fully enguage the hooks.

get?access_key=eyJpdiI6IlUva0taZE03NjBXZkIxWVJXZ2pKZ1E9PSIsInZhbHVlIjoiSVgvNjFyZGVEK1hkNHJnYnk4R2ZRdi9MdjNISGlvbU5OY016WnRVTjY1bkFrY3kwQTcyMmw0Zm0xOGlWQkRPWHRLdTR5QVBUWWpmb2drT25ab1Z3K3Rlb2ZaSDBsRUVZSzZpc2NrUXRZZDQ9IiwibWFjIjoiZDk3NWUwODJjYzc3Y2I4MTJiYThlMGQ4ZjgxYWY4ZDI1M2ZiNzVjY2Y5YTU0M2FiZjYwOGI2YTYwNmU3Y2YzMCIsInRhZyI6IiJ9&path=item-files%2F59727%2FffE0mHao806M0aGeymAUq0Z3e6wgnbHWSBxEaf7q.png&signature=2216db18313e0bf6d203766522c3d2578acfa082cff8e4fb444fdf5f84fceb0b

  1. Refit both locking brackets - slide the brackets into the slot and tight up to the mount bar.

  2. Tighten the locking bolt.

get?access_key=eyJpdiI6Ik55cU4wSUhvZHdmQzRCeTA2aW04Tmc9PSIsInZhbHVlIjoiNEY5M2hnd3l4OUtpVUF1RzFVbUhzSlJycEgzODNSQlI3M1JCRnlObjh4Smo2M3VqZC9LVDZGUnJ2UXMzTXFURFB3emIwZ2NiRURPcGFSUGJ6SXZyVG9HSlhaU2lYZWZGNjA0TW5RQlJoRzg9IiwibWFjIjoiM2E1N2I3MTUwMjNjNzlmMTg2ODRhMDZjNDUyOTJkYmZkYmFjNjZiNTUyN2RkY2NjMDYzNmYwNzRkYzE1YjNkNCIsInRhZyI6IiJ9&path=item-files%2F59727%2Fovms0KtDDU9depyOQa4Hqs0mmWTjBlLK2Xrn3kpu.png&signature=4d72b3780b85a928818e943ff5df864b6b6fd6ffd8a990ea6aa5eb3ff07a3280

Figure 5- Fitting Locking Plates